For my pet project I’ve needed to write a simple application, which checks if there is any data in specific table in my database and if there is, it sends me an email. After a few minutes of research I’ve decided to use Heroku service for it. This was my first meeting with Heroku and I was curious how easy it would be to write an app.
Heroku supports Ruby, Node.js, Python and Java. From this list I feel quite comfortable with Node.js, so I’ve chosen it.
In this blog post I guide you how to create a simple Node.js app, that can be used as a Heroku Scheduler task.
Before starting I suggest reading those articles from Heroku documentation:
You also need to install Heroku Toolbelt and Node.js (with npm package manager) on your system.
Getting Started
Let’s create a project directory:
mkdir notyfication-senderwith an empty git repository in it:
cd notyfication-sender
git init
Now we need to tell Heroku that we created Node.js app - this should be done by creating package.json file. This file describes our application and defines all dependencies for it. To do this let’s invoke command:
npm initand answer to the questions. As the result the package.json file is generated.
This is good time to do our first commit:
git add .
git commit -m "init"
First deploy
Now we are ready to create Heroku application. First we need to login to the service:
heroku loginthen we can create the app:
heroku create notyfication-senderIf you want to use European server then you should add --region eu parameter to the create command.
If all is set up, let’s do a deploy by pushing all our code from the git repository to Heroku server:
git push heroku masterThat’s it! Our first, still empty app is ready to go - except there is no code ;)
Installing add-ons
Our application will use three add-ons:
- Heroku Postgres - for storing data and retrieving them
- Heroku Scheduler - for running job every hour
- SendGrid - for sending emails
we need to add them to Heroku. This can be done by invoking:
heroku addons:add heroku-postgresql:dev
heroku addons:add scheduler
heroku addons:add sendgrid
One important note: to install add-ons you need to verify your Heroku account by providing information about valid credit card.
Node.js dependecies
To be able to use PostgreSQL and SendGrid in our JavaScript code, we need to install npm packages for them:
npm install pg --save
npm install sendgrid --save
the --save argument adds those packages as a dependency to the package.json file - this helps installing/updating them in future.
Scheduler
You can find documentation for the scheduler here, but it lacks details about Node.js and it can take some time to figure out everything on your own.
First thing, a task should be placed in the bin folder in the root project directory:
mkdir binSecond, the task should be written in a file without any extension (in our case it’s checkItems file):
cd bin
touch checkItems
The last important thing is that the first line in the script file must contain shebang that defines which interpreter program is used to run the script (here: node.js):
#!/usr/bin/env nodeFinally we are ready to write real code!
Coding
Let’s open the checkItems file with our favorite editor. The file should contain only the shebang line.
At first we should require PostgreSQL (pg) and SendGrid modules:
#!/usr/bin/env node

var pg = require('pg');
var sendgrid  = require('sendgrid')(
  process.env.SENDGRID_USERNAME,
  process.env.SENDGRID_PASSWORD
);
The process.env.SENDGRID_USERNAME and process.env.SENDGRID_PASSWORD contains your SendGrid account information. Those environment variables are set by Heroku itself.
To connect to Postgres database we need to invoke code:
pg.connect(process.env.DATABASE_URL, function(err, client, done) {
});
An important notice, to be able to use DATABASE_URL variable you need to promote your database. First we need to establish the exact URL of our database, to do it we need to execute command in the root folder:
heroku pg:infoIt lists all available databases for you program, with values of URLs. The output should be similar to this:
=== HEROKU_POSTGRESQL_RED_URL
Plan:        Dev
Status:      available
Connections: 0
PG Version:  9.3.2
Created:     2014-02-06 18:37 UTC
Data Size:   6.4 MB
Tables:      0
Rows:        0/10000 (In compliance)
Fork/Follow: Unsupported
Rollback:    Unsupported
now we can execute command:
heroku pg:promote HEROKU_POSTGRESQL_RED_URLwhich sets DATABASE_URL variable to the value of HEROKU_POSTGRESQL_RED_URL.
I won’t describe how to create tables and import data into them, you can read about this here.
Let’s return to pg module. There is one important thing to remember. When you finish your work with database, you have to invoke done() callback - otherwise the client will never be returned to the connection pool and you will leak clients.
Before writing a query, lets write a function for error handling. We can use for that the code from pg documentation:
pg.connect(process.env.DATABASE_URL, function(err, client, done) {
  var handleError = function(err) {
    if(!err) return false;
    done(client);
    next(err);
    return true;
  };
});
To query a table (I assume that there is todos table) in a database we can write such code:
pg.connect(process.env.DATABASE_URL, function(err, client, done) {
  var handleError = function(err) {
    if(!err) return false;
    done(client);
    next(err);
    return true;
  };

  client.query('SELECT * FROM todos', function(err, result) {
    if(handleError(err, client, done)) return;

    if (result.rows.length > 0) {
      //send email

      done();
      pg.end();
    }
  });
});
The idea here is to send an notification email only if there are any rows in todos table. Please pay attention that we invoke done() method when the query is done. I also invoke pg.end(); to immediately close any connections to PostgreSQL server - I do this to save dynos and close the app as fast as possible.
The last part is to write code that will send email with SendGrid module:
sendgrid.send({
    to: 'my@email.com',
    from: 'app@email.com',
    subject: 'There are some items to do',
    text: 'You have items to do'
  }, function(err, json) {
    if (err) {
      console.error(err);
    }
});
so the whole code looks like this:
#!/usr/bin/env node

var pg = require('pg');
var sendgrid  = require('sendgrid')(
  process.env.SENDGRID_USERNAME,
  process.env.SENDGRID_PASSWORD
);

pg.connect(process.env.DATABASE_URL, function(err, client, done) {
  var handleError = function(err) {
    if(!err) return false;
    done(client);
    next(err);
    return true;
  };

  client.query('SELECT * FROM todos', function(err, result) {
    if(handleError(err, client, done)) return;

    if (result.rows.length > 0) {
      sendgrid.send({
          to: 'my@email.com',
          from: 'app@email.com',
          subject: 'There are some items to do',
          text: 'You have items to do'
        }, function(err, json) {
          if (err) {
            console.error(err);
          }

          done();
          pg.end();
      });
    }
  });
});
Please notice, that I’ve moved done(); pg.end(); code to the callback of send method.
To run and test the code we should deploy it on the server and run:
git add .
git commit -m "Code for scheduler task"
git push heroku master
heroku run checkItems
If everything is OK, the code should run without any errors.
This is very simple code, that illustrate only the way of doing such task. For a production ready it should be extended and more tested.
Now when we have a code of our scheduler task, we can set scheduler on Heroku site.
Setting Heroku scheduler
To configure scheduler we need to go to its dashboard page by invoking command:
heroku addons:open scheduler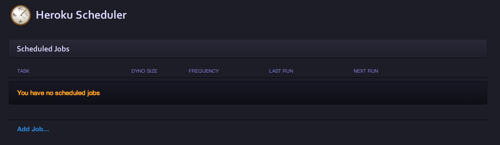
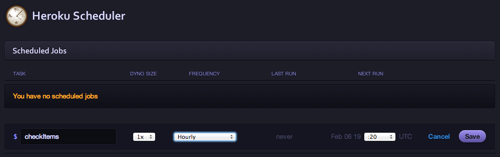
On the page click Add Job... link, in the text box write the name of the file (without any extension) that defines the task and is located in the bin folder (in our case it is: checkItems). From the drop-down list select the frequency and adjust next run time. Commit you changes by clicking the save button.
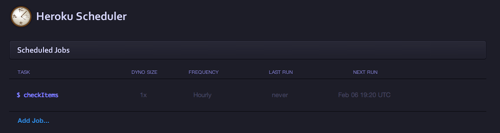
This is it, you defined your scheduler task. From now on it will run every defined period.
I hope this article will help you create your own, custom task for Heroku scheduler. Enjoy!
You can clone this code from my GitHub repository